Tutorial: How to Fix VLC 3.0's Washed Out Colors, Improve DVD Upsampling & Compress the Audio to Prevent Loud Volume Spikes
Updated for VLC 3.0 on 2018-06-09 | by Zeus
VLC is the swiss army knife of video players. It's free and does everything so well that when Windows lost the ability to play DVDs, VLC was the top recommendation. Problem is, VLC's default settings are focused more on compatibility than quality. But with just a few tweaks, you can make VLC every bit as awesome as the above image is trying so desperately to be.
Step 1. Improve VLC's Color With Full Range
Depending on your setup, VLC can look washed out [external link]. This has to do with the color range being limited (16-235) rather than dynamic (0-255). But all you need to know is how to fix it.
Note: If you do not have a dedicated NVIDIA graphics card or Intel HD Graphics, skip to Step 2.
If you have Integrated Intel HD Graphics
Hint: Any computer powered by an Intel CPU probably has integrated Intel HD Graphics.

- Right-click your desktop and select "Graphics Properties..."
- Click the large VIDEO icon
- Under INPUT RANGE, check DRIVER SETTINGS
- Under the newly expanded DRIVER SETTINGS, check FULL RANGE
If you have an NVIDIA Graphics Card
- Right-click the NVIDIA Settings icon in the system tray and open "NVIDIA Control panel"
- If you don't see an NVIDIA icon in your system tray, just search your start menu for:
NVIDIA Control Panel
- If you don't see an NVIDIA icon in your system tray, just search your start menu for:
- Select "Adjust Color Settings" under VIDEO*
- Select "With the NVIDIA settings" under "How do you make color adjustments?"
- Under ADVANCED, change the DYNAMIC RANGE to "Full (0-255)"
*Note: For various reasons, these options might be greyed out. If your PC has both a dedicated NVIDIA graphics card and integrated Intel HD Graphics, you might need to make the change in the Intel HD Control Panel (because the NVIDIA is being used for gaming, while the Intel HD handles day-to-day Windows operations like playing videos). If for some reason you can't make the change to either, don't worry about it too much, the next step should also help.
Step 2. Output OpenGL
This step is really important. It might improve the color (especially if you skipped Step 1), and paves the way for all the fancy video upsampling we're about to do.
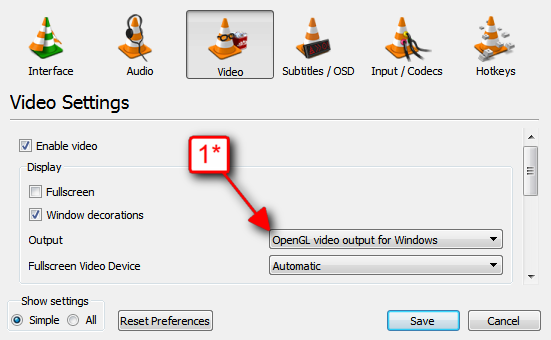
- Open VLC
- Go to Tools -> Preferences -> Video tab
- Using Windows?*
- Change OUTPUT to "OpenGL Video Output for Windows"
- Otherwise: Change OUTPUT to "OpenGL Video Output"
- Click the SAVE button (lower right corner next to CANCEL)
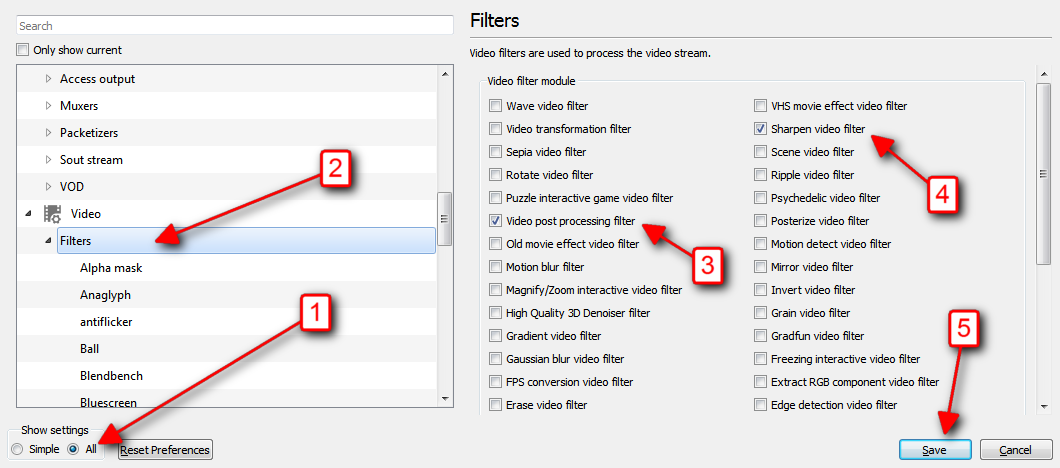
Step 3. Enable Video Filters
Video filters enhance the picture quality, but before we can adjust them, we have to turn them on, which means dressing like Bugs Bunny in drag revisiting our old nemesis, Preferences.
(Stop squintin' and click to enlarge!)
- Open VLC
- Go to Tools -> Preferences
- In the bottom left corner under SHOW SETTINGS, select "ALL". This enables Advanced Preferences. More! MOAR!
- Scroll down to VIDEO. Under that, select FILTERS
- Check the following filters to turn them on:
- SHARPEN VIDEO FILTER
- VIDEO POST PROCESSING FILTER
- Click SAVE
Note that the numbered steps in the graphic don't correspond to the written instructions, because I am on a whole nother level your puny Earth-minds cannot begin to comprehend.
Step 4. Fine-Tune Video Filters
Next we expand FILTERS under Video by double clicking the entry or clicking the little dot, then enter the following settings.
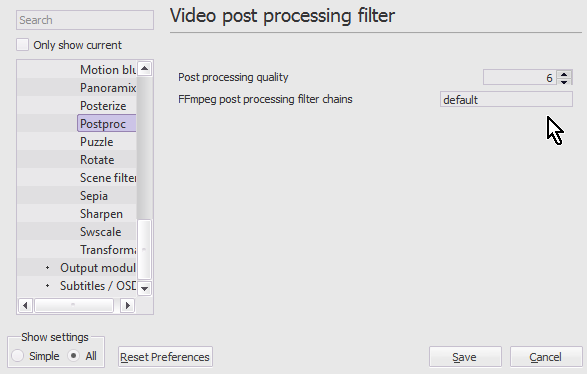
- Expand FILTERS, revealing a new branch of options.
- Select POSTPROC. Set POST PROCESSING QUALITY to "6"
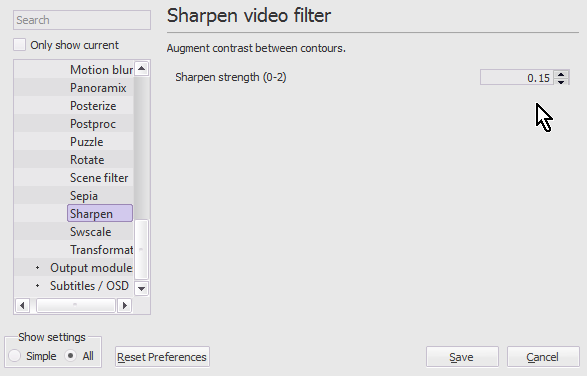
- Select SHARPEN. Set SHARPEN STRENGTH to "0.15". (You can go lower, 0.5, or higher 0.25, depending on the source. Sharpening works best on high bitrate, good quality video, but sharpening poor quality videos can actually accentuate flaws, like those shoes you're wearing.)
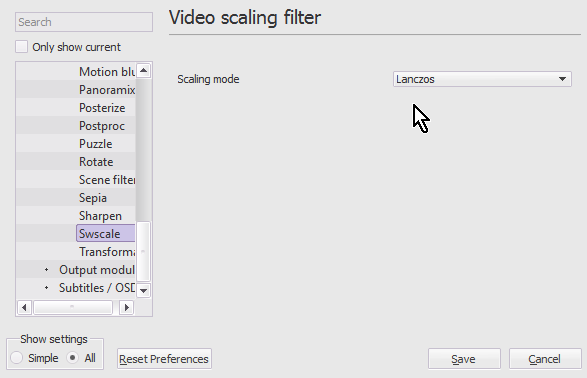
- Select SWSCALE. Set SCALING MODE to LANCZOS
- Click SAVE
And now for a bit of an explanation. Feel free to the next step if you Just. Don't. Care.
Post Processing applies various tweaks to the video, to smooth out macroblocks and conceal unsightly blemishes. "6" is the strongest setting. If it looks too smoothed out, or you rarely watch low quality videos, or if you have a really slow computer, you can lower it to "3" or even "1". But some degree of Post Processing is highly recommended.
Sharpen, well, sharpens the video, which is good because you're taking a relatively small picture (720x480 DVD) and blowing it up to whatever impossibly high resolution your monitor is set at. Upscaling tends to make things look a bit fuzzy around the edges, sharpening helps alleviate that.
Lastly, SWSCALE sounds like a nonsense word, like swag or swole, but is actually the method of upscaling. Lanczos will upscale the DVD or video and keep things looking nice and sharp. If you have a really slow computer, you can set it to Bicubic, or Bilinear or even Fast Bilinear. There's no one "best" method, but if your rig can handle it, Lanczos is generally the way to go.
Step 5. (NEW!) Disable Hardware-Accelerated Decoding
Keen-eyed readers may have noticed that the original version of this guide skipped straight from Step 4 to Step 6. While some might have assumed it was a mistake, or simply me messing with them, the honest answer is I received a message from an otherworldly being while deep in meditation, a creature of light and shadow that told me someday, my destiny would be arrive, and I would write Step 5. That day has come.
Hardware decoding is great in theory, but in practice it's better to skip it, much like the previous paragraph you read with mounting frustration. By disabling hardware decoding, we avoid some problems, and enable VLC's excellent Lanczos scaling.
- Open VLC
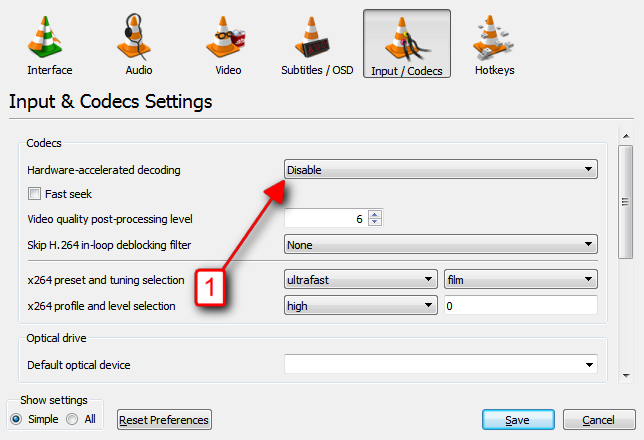
- Tools -> Preferences -> Input/Codecs (Under "Simple" settings, not "All")
- Under CODECS, set HARDWARE-ACELLERATED DECODING to DISABLE.
- SAVE
Step 6. (OPTIONAL) Deinterlace Video Method
If you watch old VHS rips or weird DVDs, you'll run into interlaced video, which makes the edges of things (people, explosions) look jaggy. While VLC can try to automatically fix that for you, it's not the best at detecting whether video is actually interlaced. But one thing you can do is select a good Deinterlace method, for when you actually need it.
- Open VLC
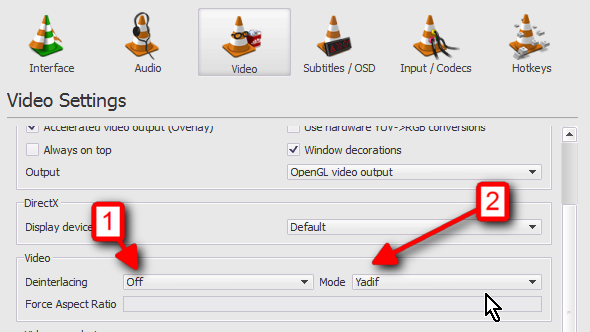
- Tools -> Preferences -> Video (Under "Simple" settings, not "All")
- Under VIDEO, set DEINTERLACING to OFF (default).
- Set MODE to YADIF. For slower computers, try "Linear," or if you're a future man from the future, "Yadif (2x)"
- SAVE
From now on, if you notice "jaggies", press D to toggle Deinterlacing ON or OFF.
Step 7. Compress audio to keep LOUD noises from being WAY TOO FREAKING LOUD
whisper whisper BOOM whisper BOOM important revelatioJK,BOOOOOM!
The audio found in Blu-rays and DVDs was engineered by people with expensive home theaters systems and not a cranky neighbor or sleeping baby in sight.
If you're sick of whispered dialog being punctuated by ear-bursting gunshots or the violin strings of spring-loaded cats, here's a quick fix that will make the quiet parts louder and keep the loud parts from making you feel like the hearing-aid kid from Nightmare on Elm St. Part Whatever.
- Open VLC
- Tools -> Preferences
- Show Settings: ALL
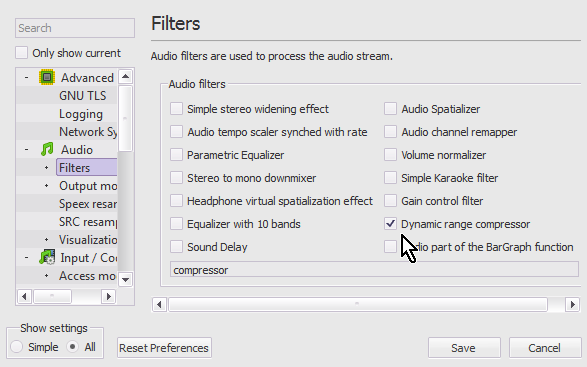
- Scroll down to AUDIO, expand it to reveal FILTERS
- Select FILTERS, check DYNAMIC RANGE COMPRESSOR
- Expand FILTERS, revealing COMPRESSOR
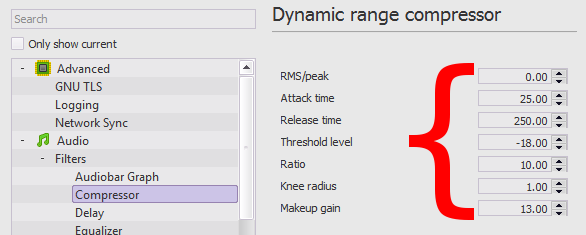
- Select Compressor, enter the following settings:
- RMS/PEAK: 0
- Attack: 25
- Release: 250
- Threshold: -18
- Ratio: 10
- Knee radius: 1.0
- Makeup gain: 13.0
- SAVE
Note that Threshold is minus 18, while the rest of the numbers stay positive, thanks to exercise and healthy diet. If you find the loud parts are still too loud, you can increase the Ratio up to "20", but audio engineers warn you'll lose a lot of the dynamic range if you go over 4 or 5. I usually split the difference at 10.
By the way, this will enable compression by default. If you'd like to turn it off for a certain movie, click the "SHOW EXTENDED SETTINGS" icon (near PLAY), select the AUDIO EFFECTS tab, the COMPRESSOR tab, and uncheck "Enable".
Troubleshooting
Problem: Videos now look choppy or run sluggishy.
Solution: Try changing the scaling mode from LANCZOS to BILINEAR, the deinterlacing method from YADIF to LINEAR, and Post-processing quality to 1.
Note: If you experience crashes before or after following this guide, try switching to the 32-bit version of VLC. Even if you're using 64-bit Windows, the 32-bit version seems to be more stable. At least according to me, the guy who wrote a whole guide on this. What do I know.
In Conclusion
If my instructions were followed correctly, then color should look rich and vibrant, DVD-sized videos should be upscaled and enhanced, and there should be less difference between explosions and dialog. But if not, then we are doomed, every last one of us. You've doomed us all to hell.
Enjoy!
Changelog
2018-06-09
- Specified OUTPUT to "OpenGL Video Output for Windows" if using Windows
- Removed "Uncheck 'Use hardware YUV->RGB conversions'" from Step 2. Setting now appears to be off by default, and possibly never helped to begin with.
- Removed VIDEO SCALING FILTER from Step 3. See: Step 5.
- Added Step 5.
- More terrible jokes!
Sources
- How to change RGB Levels Intel 4000HD
- How to Fix Washed out Colors issue in VLC Player
- LPT: If a movie is too low during dialogues, use the VLC Dynamic Range Compressor to automatically adjust the volume.
- How to use VLC as an upscaling media player
- Which resize algorithm to choose for videos?
- What is the best deinterlacing method in vlc qualitywise?
- Deinterlacing
- Video Colors are washed out
- can't activate swscale filter
The title image is a Frankenstein's Monster with parts stolen from various graves: